Add API gateway traffic management policies
ngrok's API gateway is designed for composability, allowing you to pick and choose from many Traffic Policy actions and order them in many ways to manage API traffic according to your needs.
With our common pattern of using a cloud endpoint to route traffic to internal agent endpoints, you can centrally manage certain policies like rate limiting or authentication, then compose additional policies onto specific internal agent endpoints and API services.
If you haven't yet deployed ngrok as your API gateway, start with one of these tutorials:
- Get started with an API gateway
- Deploy an API gateway in Kubernetes
- Deploy a multi-cloud API gateway
Add a rate limiting policy to all API services
We recommend you add a rate limiting policy on your cloud endpoint to protect all your services from unintentional misuse and malicious attacks.
When you apply rate limiting to your cloud endpoint, then forward traffic to one or more internal URLs, then ngrok applies the policy equally across all your API services.
The Traffic Policy file below:
- Allows up to
10requests per IP in a60swindow. - Rejects requests that exceed the rate limiting
capacitywith a429error response. - Forwards all requests not subject to the rate limit to an internal endpoint.
You will need to edit this action, and potentially add additional
forward-internalactions, based on your routing topology.
Loading…
Apply the rule to your cloud endpoint with the dashboard or API.
- Dashboard
- API
Navigate to the Endpoints section of the ngrok dashboard and click on the cloud endpoint to edit.
Paste in the YAML above and click Save to apply the Traffic Policy rules.
Save the YAML above into a file named policy.yaml or similar.
Use the ngrok CLI to update your endpoint based on its id.
Loading…
If you don't remember your cloud endpoint's id, run ngrok api endpoints list and find it from the list.
Test your rate limiting policy
You can test the rate limiting action by running the following command,
substituting the appropriate value for {YOUR_NGROK_DOMAIN}:
Loading…
You'll see a few normal responses until you hit the rate limit, and then you'll
see 429 errors returned.
Add a security policy to all API services
The JWT validation policy action allows you to integrate your ngrok endpoints with your existing authentication provider. This example provides step-by-step instructions for integrating with Auth0, but you can configure JWT validation for any OAuth provider.
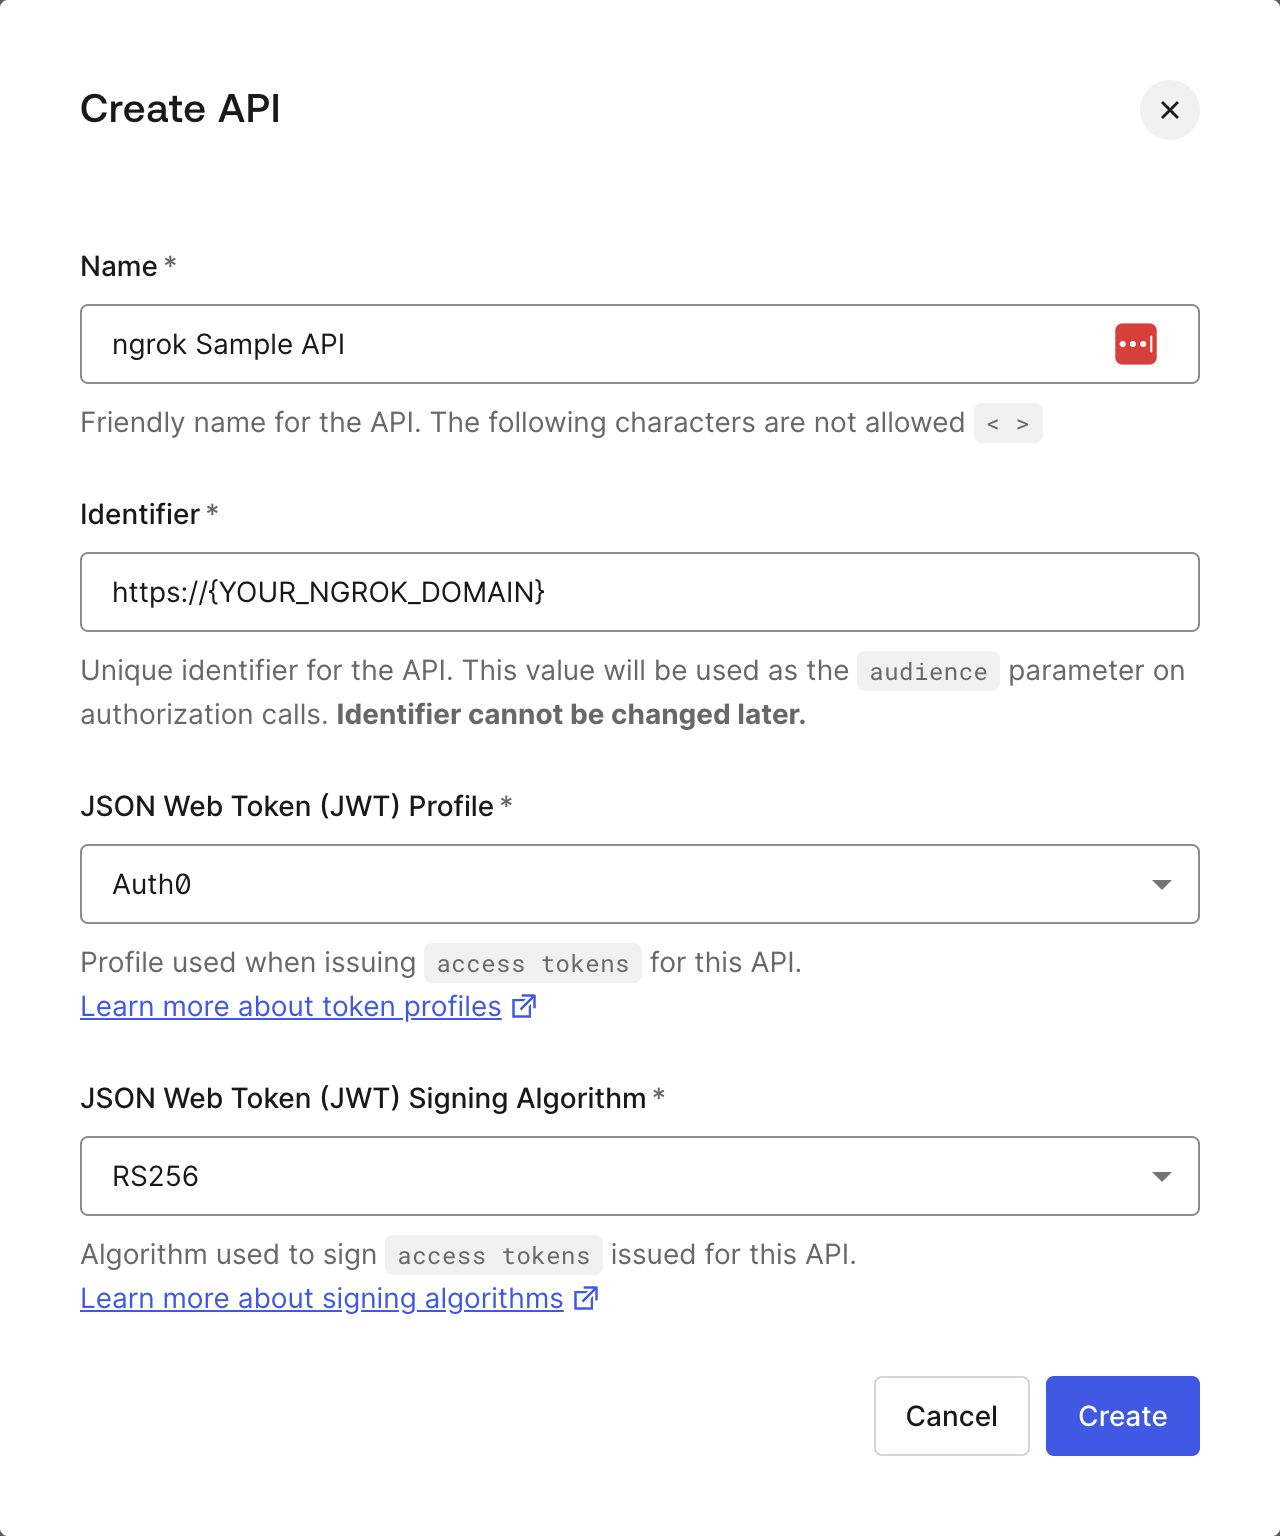
Define your API in Auth0
- Log in to your Auth0 tenant dashboard.
- Select Applications > APIs, then + Create API.
- Name your API whatever you'd like.
- Replace the value of the Identifier field with
{YOUR_NGROK_DOMAIN}. - Leave the default values for JSON Web Token (JWT) Profile * and JSON Web Token Signing Algorithm *.
- Click Create.
Access your JWT
Upon creating your new API, Auth0 will create an associated application under Applications > APIs in the left navigation bar.
Navigate to your application, and click on the Test tab. Here, you will
find a signed, fully functional JWT, as well as examples of how to programmatically
generate one.
Update your Traffic Policy rules with the validate-jwt action
The Traffic Policy file below:
- Integrates ngrok with your authentication provider so ngrok can validate JWTs passed in requests to your API.
- Rejects requests without a
Authorization: Bearer ...header or valid token. - Forwards all authenticated requests to an internal endpoint. You will need to
edit this action, and potentially add additional
forward-internalactions, based on your routing topology.
Loading…
Replace {YOUR_AUTH0_TENANT_ID} and {YOUR_NGROK_DOMAIN} and apply the rule to
your cloud endpoint with the dashboard or API.
Test your authentication policy
You can test the JWT validation policy by running the following command,
substituting your domain for {YOUR_NGROK_DOMAIN} and the JWT obtained from the
Auth0 dashboard for {YOUR_JWT}:
Loading…
You'll receive a 200 response and body, if applicable.
Run the same command, switching out one character of your JWT, and you'll get a
403 Forbidden error.
Run the command with no Authorization header, substituting your domain for
{YOUR_NGROK_DOMAIN}:
Loading…
You'll receive a 401 Unauthorized error. Your API is now protected from
unauthorized requests.
Compose policies on specific API services
In certain cases, you'll want to apply Traffic Policy rules to just one API service—in those cases, you should update your internal agent endpoint with a Traffic Policy file.
Example with the circuit-breaker action
For example, one API service is running on a machine with less system resources,
making it more suseptible to errors during peak load. You can implement the
circuit-breaker Traffic Policy
action on just the internal
agent endpoint that forwards traffic to that service for additional protection.
Create a new Traffic Policy file named circuit-breaker.yaml on the system
where this internal agent endpoint runs. To help you see how it works, the
following circuit-breaker rule sets an intentionally low volume threshold that
allows 10 requests in a 60s window before tripping the circuit breaker for
2m.
Loading…
Restart the ngrok agent on the same internal URL, while also specifying your new Traffic Policy file.
Loading…
If you're using other configuration flags, like --pooling-enabled=true, make
sure you add those to the command above.
You can test this behavior out by sending multiple curl requests to your APIs
in quick succession to trip the circuit breaker.
What's next?
You've now adding common traffic management policies to your ngrok API gateway at both your cloud and internal agent endpoints, allowing you to centrally manage certain rules and compose others as needed.
Explore other opportunities to manage and take action on API traffic in our Traffic Policy documentation.
Check out your Traffic Inspector (documentation) to observe, modify, and replay requests across your API gateway.